
3 Chapter 3 – Volume Measurements using Micropipettes
Volume Measurements using Micropipettes
BACKGROUND
Very tiny amounts of chemicals and biological reagents are used in many molecular biology experiments. To measure these minute , technicians use that measure in (µl) amounts. This activity introduces micropipetting technique. As with all fine motor skills, learning how to use a micropipette takes practice and determination. Students must be able to measure these very tiny volumes with and .
Micropipettes are used to dispense solutions in the range. The microliter is a small volume, yet measurable in a typical laboratory. A is a metric unit of volume equal to a thousandth of a liter. A microliter is a unit of volume in the Metric System. The symbol for microliter is μL. There are 1,000 microliters in a . An example of when you might use microliter volumes would be in preparation of an electrophoresis sample, when isolating DNA, or during chemical purification.
Volume smaller than microliter is . The prefix nano means one billionth and is symbolized as n in the . Nano denotes a factor of one billionth (10-9) which means that there are 1,000,000,000 nanoliters in a .
Use the following information to calculate metric volume conversions:
- 1 µL = 10–6 L = 10–3 mL
- 1 nL = 10–9 L = 10–6 mL
- 1000 nL = 1 µL
- 0.001 µL = 1 nL
are among the essential laboratory instrument used to accurately distribute different volumes of liquids in the microliter range. In order to prevent cross contamination, micropipettes use disposable tips to aspirate liquid and distribute the solution.Micropipettes enable sterile and accurate liquid handling.
There are several types of micropipettes on the market which can be classified according to:
- Volume: fixed or variable volume micropipette
- The principle of operation: air displacement or positive displacement micropipette.
- The operating mechanism: mechanical or electronic micropipette
- The number of channels: single-channel or multi-channel micropipette.
The different parts of a variable volume micropipette are:
- Plunger that is used for volume adjustment and to aspirate and dispense the desired amount of liquid into the tip of the micropipette.
- Trip Ejector that helps to remove the tip from the micropipette, without touching them, by pressing the tip eject button.
- Volume Window that displays the adjusted volume in the volume window (volume set to be aspirated/dispensed).
- Micropipette Shaft is a tube filled with air. Pressing the piston expels a volume of air contained in the rod, releasing the piston allows this air to return to the rod.
- Micropipette Tips are tips attached to a micropipette to collect liquid and then transfer it from one place to another. Tips of different sizes are used to collect different volumes of liquid.


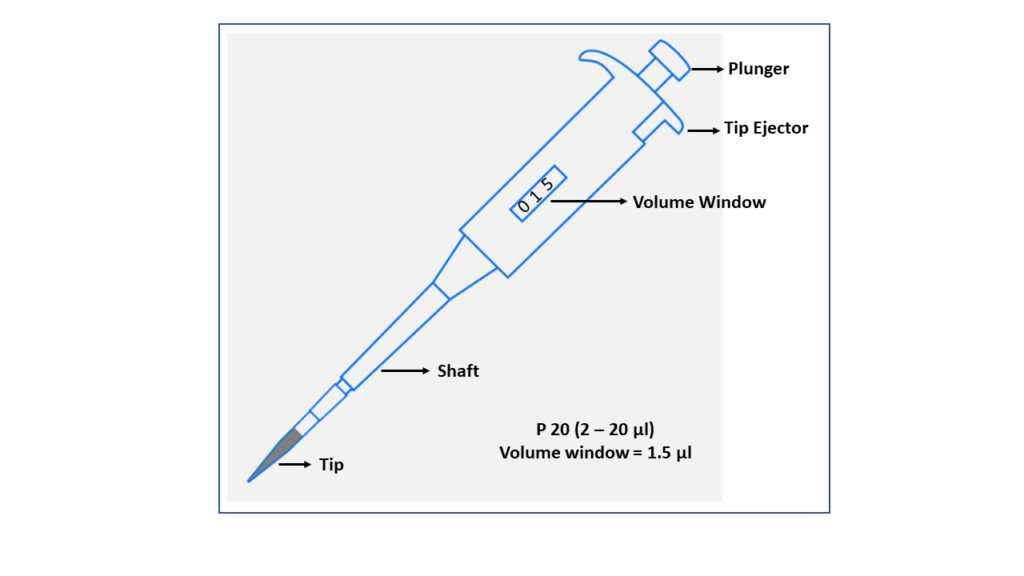
In a variable volume micropipette the volume of liquid to be aspirated or dispensed are adjusted according to the capacity of the micropipette (a specific minimum and maximum volume range). The acronyms P10, P20, P1000 on micropipettes represent the maximum volume that can be aspirated/dispensed
In the lab, the most common micropipettes are:
- P-10 measures volumes of 0.5 µl to 10 µl in 0.02 µl increments;
- P-20 measures volumes of 2 µl to 20 µl in 0.02 µl increments;
- P-200 measures volumes of 20 µl to 200 µl in 0.2 µl increments;
- P-1000 measures volumes of 100 µl to 1000 µl in 2 µl increments.
Operate the micropipette slowly and carefully.
Always use the correct pipet for the job. Most labs have four sizes of micropipettes:
Never attempt to set a volume beyond the pipet’s minimum or maximum values. Only set the volume within the range specified for that micropipette.
| Acronym | Volume |
|---|---|
| P-2 | 0.2 – 2 µl |
| P-10 | 1 – 10 µl |
| P-20 | 2 – 20 µl |
| P-100 | 20 – 100 µl |
| P-200 | 20 – 200 µl |
| P-1000 | 100 – 1000 µl |
Micropippete performance is evaluated using a . Gravimetric methods depend on the high and of analytical balances. During gravimetric testing, a desired volume of purified water is aspirated and dispensed from the device to be checked. The desired volume is termed the “nominal volume.” The volume is then checked by weighing the liquid on a high-quality analytical balance. A calculation is performed to convert the weight of the water to a volume. If the volume-measuring device is accurately operating, then the nominal volume will be identical to the volume calculated from the weight of the water. This process indicates the of the device being tested.
Overview and demonstration of miciropipetting technique
Key Terms
- Metrology
- Measurements
- Liters, Milliliters, Microliter
- Micropipette
- Accuracy
- Precision
- Gravimetric method
Objectives
- Review available types of micropipettes.
- To determine which micropipettes’ are best used to measure specific volumes.
- To precisely measure using various sized micropipettes’ (P-20, P-200 and P-1000).
- To accurately prepare samples using each size micropipette.
Materials
- Microcentrifuge tubes, 1.5 ml (4)
- Microcentrifuge tube rack
- Micropipettes and tips (P-20, P-200, P-1000)
- Microcentrifuge
- Permanent Marker
- Blue Dye
- Red Dye
- Green Dye
- Yellow Dye
- Wax paper (3)
- Beakers (4)
*Colored dyes are stock solutions of 1 ml food coloring and 499 ml of water.
Pre-assessment
- Complete the following conversions:
-
- 500 uL = __________mL
- 25 mL = ___________uL
- 2290 uL = __________nL
- 875 mL = ___________uL
- 3 uL = ____________mL
- 175 uL sample is needed for an experiment. Which micropipette will measure this amount.
- 1650 uL sample is needed for an experiment. Which micropipette will measure this amount.
- What do you think would happen to the accuracy of your measurement if the plunger is depressed to the second stop instead of only the first stop when taking up a sample?
- What volume is the pipette set for in the 3 pipettes?
Exercise 1: Pipetting Exercise
PROCEDURE
- Using a permanent marker, label the empty microcentrifuge tubes A, B, C and D.
- Using the smallest micropipette possible, measure the dye solutions into each tube according to Table 1.
- Use a new pipet tip each time a new color dye is used.
- Add the smallest volume first.
- Add the next volume to the inside of the tube without letting the drops touch. The drop will stick because of adhesion.
- When all volumes have been added, bring the drops to the bottom of the tube with a quick wrist flick.
- Spin tubes A and B in the microcentrifuge for 1 to 2 seconds to aspirate the solutions. Move the tubes to the rack.
Table for Mixing the Solutions Centrifuge Tube Red Dye Blue Dye Green Dye Yellow Dye A 4.0 µl 5.4 µl 2.2 µl —– B 6.5 µl 2.5 µl —– 2.6 µl C 22.0 µl 31.5 µl 22.0 µl 44.5 µl D —– 210 µl 205 µl 350 µl - Spin tube C in the microcentrifuge for 1 to 2 seconds to pool the solution. Be sure to balance the microcentrifuge with a tube containing an equal volume.
- Flick tube D with a finger to mix the contents.
- Compare tubes A through D with the key tubes provided by the instructor
- For each sample tube, check the level of the final volume AND the final color (indicative of accurate measurement and thorough mixing).
- Indicate in the data table whether your sample tubes were accurately prepared for volume and final color.
- As an additional check of accuracy:
- Set the micropipette to the correct added volume and carefully withdraw all of the fluid in tube A. The contents should fill the tip with no air space at the bottom of the tip and no leftover fluid in the tube. Repeat with tube B. Record whether there was any air space in the tip.
- Set the micropipette to the correct volume and carefully withdraw all the fluid in the tube.
- The contents should just fill the tip with no air space at the bottom and no leftover fluid in the tube. Record whether there was any air space in the tip.
- Set the micropipette to the correct volume and carefully withdraw all the fluid in the tube.
- The contents should just fill the tip with no air space at the bottom and no leftover fluid in the tube. Record whether there was any air space in the tip.
- Discard the microcentrifuge tubes and pipet tips into the trash. Rinse the beakers and return to storage.
PRECAUTION
- Never use the micropipette without the tip in place; this could ruin the piston.
- Never let the plunger snap back during withdrawing or expelling fluid; this could damage the piston. To prevent the damage, slowly draw up the liquid into the pipette tip.
- Never rotate the volume adjustor beyond the upper or lower range of the pipette, as stated by the manufacturer.
- Never immerse the barrel of the micropipette in fluid.
- Never reuse a tip that has been used to measure a different reagent.
DATA TABLE
| Tube | Color of Solution | Accuracy of Volume
(yes or no) |
Total Volume
|
Pipet tip had airspace
(yes or no) |
Final Check by Instructor |
|---|---|---|---|---|---|
| A | |||||
| B | |||||
| C | |||||
| D | |||||
DATA ANALYSIS & CRITICAL THINKING
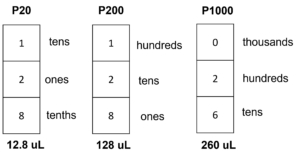
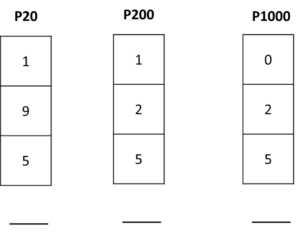
- By what increment of measurement do the following micropipettes increase (0.1µL, 1µL, etc.)?
- P-20 _______________
- P-1000 ________________
- P-200 _________________
- What volumes, in general, do micropipettes measure?
- What volumes do each of the following types of micropipettes measure?
- P-10 ____________
- P-20 ____________
- P-200 ___________
- P-1000 ___________
- Why should a micropipette be held at a 45° angle when obtaining a sample?
- When obtaining a sample, first depress the plunger on the micropipette to which “stop”?
- Why touch the tip to the inside wall of the reaction tube when expelling a sample?
- Why keep the plunger depressed when removing the pipette from the tube?
- Why is it important to change tips for each new reagent?
- Why is it important to keep a micropipette in a vertical position when there is fluid in the tip?
Licenses and Attributions
Biology I Cellular Processes Laboratory Manual by The authors & Hillsborough Community College is licensed under a Creative Commons Attribution-NonCommercial 4.0 International License.
The amount of space a substance occupies. Biologists commonly use units of liters (L), milliliters (mL), and microliters (uL) to express volume.
Micropipettes are a device commonly used in laboratories to aspire and dispense liquid, usually down to 0.1 uL
A measure of volume for a liquid, using the metric system. One microliter (μL) is equal to a millionth of a liter.
Metrology is the science of measurement and its application. Metrology can be divided into three subfields: scientific metrology, applied metrology, and legal metrology.
Accuracy is how close a given set of measurements are to their true value. A measurement system is considered valid if it is both accurate and precise.
Precision is a description of random errors, a measure of statistical variability. A measurement system is considered valid if it is both accurate and precise.
A milliliter is a unit of volume in the Metric System. The symbol for milliliter is mL. There are 0.001 milliliters in a microliter.
The nanoliter is a unit of Volume in the metric system. It is equal to one billionth of a liter in the International System of Units (SI).
It is the decimal measuring system based on the meter, liter, and gram as units of length, capacity, and weight or mass.
A metric unit of capacity, formerly defined as the volume of one kilogram of water under standard conditions, now equal to 1,000 cubic centimeters.
Gravimetric method includes all analytical methods in which the analytical signal is a measurement of mass or a change in mass.
The action of finding out the size, weight, force, length, or amount of something. A measurement can also be a unit or system to calculate a standard measure.
