
2 Chapter 2 – Microscope
Microscope
BACKGROUND
A microscope is an essential instrument for magnifying small things for visualization. Microscopes allow scientists to visualize tiny organisms and magnify structures, giving a contrasting image. Microscopes are made up of lenses for magnification, each with its magnification powers. Depending on the lens type, it will magnify the specimen according to its focal strength.
The Cell Theory states that all biological organisms are composed of cells; cells are the unit of life and all life come from preexisting life. The cell theory is so established today that it forms one of the unifying principles of biology.
The word cell was first used by Robert Hooke (1635–1703) when he looked at cork with a simple microscope and found what appeared to be blocks of material making up the cork. The term today describes a microscopic unit of life that separates itself from its surroundings by a thin partition, the cell membrane.
The earliest known cells are called the . They were found in the fossilized sediments from 3.5 billion years ago. The prokaryotes lack nuclei and membrane-bound nucleus organelles. Cells with well-defined nucleus and membrane bound nuclei are called cells did not appear in the fossil records for another 2 billion years.
Compound Microscope
There are several types of microscopes, but the two types you will utilize in this class are known as the and the . A compound light microscope is used to look at cells, tissues, and microscopic organisms. The compound microscopes magnify specimens from 40 to 1000 times. A stereo microscope, also known as a dissecting microscope, is used to look at live specimens and large specimens.
There are typically two light features, a top light and a bottom light. The top light (incident lighting) is used to illuminate the surface of the specimen. The bottom light source (transmitted lighting)is used to shine light up through a translucent specimen.
While the Light microscopes use the power of the light, the more advanced microscopes are Electron microscopes that leverage the energy of electrons. A scanning electron microscope (SEM) is a type of electron microscope that produces images of a sample by scanning the surface with a focused beam of electrons. The electrons interact with atoms in the sample, producing various signals that contain information about the surface topography and composition of the sample
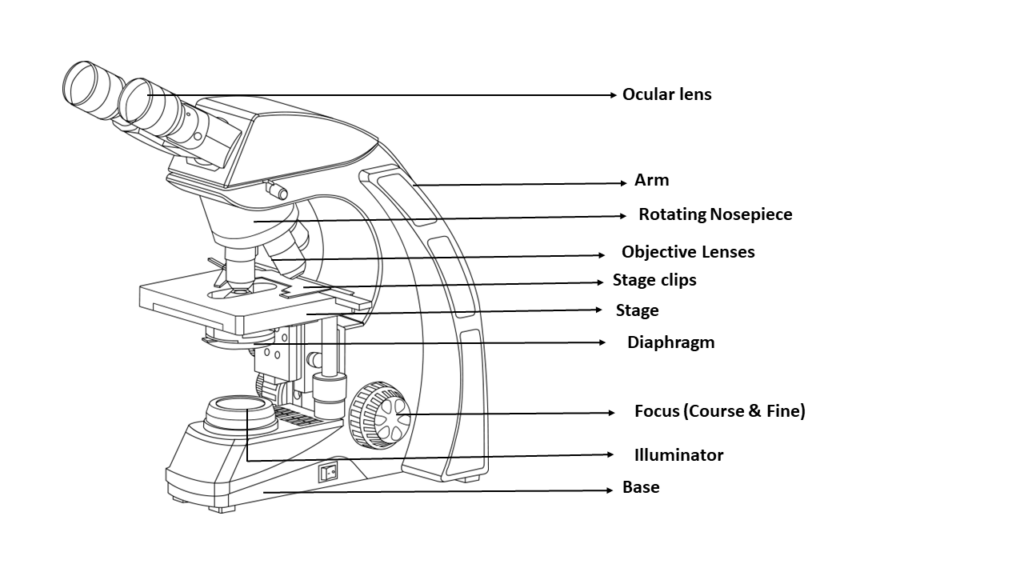
Parts of a Microscope and their function
- Ocular
- Body
- Nosepiece
- Objectives
- Arm
- Mechanical stage
- Stage adjustment knobs
- Substage condenser
- Aperture diaphragm
- Light source
- Base
- Coarse focus adjustment
- Fine focus adjustment
Learn the parts of the microscope (activity)
- Visit NC BioNetwork Virtual Microscope
- Click on “Explore”
- Click on “Learn” to learn their name and function
Electron Microscope
An e is a microscope that uses a beam of electrons as a source of illumination. They use electron optics that are analogous to the glass lenses of an optical light microscope.
- Scanning electron microscope (SEM) is a type of electron microscope that produces images of a sample by scanning the surface with a focused beam of electrons.
- Transmission electron microscopy (TEM) is a microscopy technique in which a beam of electrons is transmitted through a specimen to form an image. The specimen is most often an ultrathin section less than 100 nm thick.
Transmission electron microscopes are capable of imaging at a significantly higher resolution than light microscopes. The TEM has the added advantage of greater resolution. This increased resolution allows the viewer to study ultrastructure of organelles, viruses and macromolecules. TEMs find application in cancer research, virology, and nanotechnology and in other fields as well.
Scanning electron microscope uses an electron beam emitted from an electron gun fitted with a tungsten filament cathode. Tungsten is normally used in thermionic electron guns because it has the highest melting point and lowest vapor pressure of all metals. The electrons interact with atoms in the sample, producing various signals that contain information about the surface topography and composition of the sample.
More information regarding electron microscope is available at
The Univeristy of Iowa, Central Microscopy Research Facilities
University of Bristol, Wolfson Bioimaging Facility
Key Terms
- Microscopic
- Compound Light Microscope
- Electron Microscope
- Stereo Microscope
- Objective Lenses
- Ocular Lens
- Wavelength of Light
- Magnification
- Resolution
- Beam of electrons
Objectives
- Identify the parts of a compound light microscope and know the function of each part.
- Differentiate between the types of microscopes.
- Use proper microscope technique to view slides.
- Be able to focus a microscope under each objective
- Be able to calculate total magnification of an image.
- Use oil immersion.
Materials
- Compound light microscope
- Lens paper
- Clean slide & coverslip
- Prepared slide – letter “e”
- Three bacteria types slide
- DI water bottle
- Dropper bottle with immersion oil
PRE-ASSESSMENT
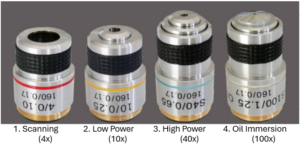
- Name the four types of Objective lenses and their magnifications.
- What is the energy source for compound light microscope?
- What is the energy source for electron microscope?
- Name two structures found in both light and electron microscopes.
- What kind of stains are used for preparing specimens for electron microscope?
Exercise Prep
PROCEDURE
- Preparing the Compound microscope:
-
- Plug in your microscope and turn on the light source.
- You may move the oculars (eyepieces) (10x) closer or further apart to adjust to the distance between your eyes. Look into the oculars and adjust them so that you see one circle of white light (not 2).
- One of your oculars also has a diopter adjustment ring used to adjust focus to account for differences in visual acuity between your two eyes.
- It would be best to always clean the microscope lenses before and after each use. A dirty microscope can severely impair your ability to see an image. If necessary, use lens cleaner and lens paper to clean all the glass surfaces on your microscope and slide. You MUST only use lens paper to clean the microscope lenses; never use Kimwipes or paper towels!
-
- Using the Microscope
- Place the slide on the stage, securing the slide in place with the stage clip. Using the stage adjustment knobs, position the slide so the specimen is positioned directly over your light source. You can do this using your naked eye; you do not need to look in the oculars yet.
- Make sure your scanning objective lens (4x) is positioned in place before continuing. Using the coarse adjustment knob, move the stage as close as possible to the scanning lens. ALWAYS start with the scanning objective lens. You may want to jump ahead to other magnifications but restrain your impulse.
- Look through the oculars while slowly turning the coarse adjustment knob to lower the stage.
- When you can distinguish the object on the slide, switch to the fine adjustment knob to finish focusing. Please make sure the object is focused and completely clear to see.
- Make sure your object is centered in the field of view before continuing.
- Move the nosepiece so the low-power objective lens (10x) is over the slide. These microscopes are parfocal, meaning the object viewed should stay primarily focused when you change the magnification. Use the fine adjustment knob to focus if necessary.
- Once again, ensure the object is centered in the field of view before continuing.
- Flip to the high-power objective lens (40x). From this point on, use only the fine adjustment knob to focus! Using the coarse adjustment knob could lead to broken slides or microscopes.
- In later exercises, you will use one more objective lens, the oil immersion objective lens (100x). The oil immersion lens is specifically designed for use with oil which has the same refractive index as the glass of the lens. Due to the uninterrupted refractory area from lens to slide, the oil immersion lens can produce greater resolution than dry lenses.
- You may adjust the contrast on your image in two ways:
- Adjust the diaphragm to allow more or less light to illuminate your slide.
- Using the dimmer switch is typically associated with turning the microscope light on and off.
Exercise 1 – Letter E
- Take a letter “e” slide and follow steps 1a through 2e from “General Rules for Microscope Use” above. You should be able to see the letter “e.”
- With your naked eye, look at the positioning of the “e” on your slide (the specimen). Now look at the “e” position through the oculars (the image).
- Now let’s try a demonstration. Using the mechanical stage adjustment knobs, move the slide until half of your letter “e” is no longer visible in your field of view. Change to the low-power objective lens. You may focus at this point, but don’t move the slide!
- Return to the scanning objective lens and center your “e” in your field of view.
- Now continue through the abovementioned steps in “General Rules for Microscope Use.
- Choose an appropriate magnification for your letter “e.” You want your image of the “e” to be as large as possible without the magnification so large that parts of the “e” disappear from your field of view. You may notice that your “e” appears to be a solid black on the lower magnification levels, but on higher magnifications, the “e” appears composed of many small printed black dots. The ability of a microscope to separate and distinguish between two dots divided by a small space is known as resolving power.
Exercise 2 – TYPES of BACTERIA
The most powerful lens of the light microscope is the 100x oil immersion objective lens. Because light is refracted every time it passes through a medium with a different refractive index (air to glass or vice versa), the quality of the image is reduced with each passage. Thus, clarity, brilliance, and resolving power are preserved by reducing the number of such passages to a minimum.
Three critical rules attend the use of this lens:
- Never use an oil immersion lens without the oil.
- Never get oil on any other lens.
- Clean up all oil when finished.
- You will need to place the three bacteria types slide on the microscope.
- Focus at low power (4x); increase magnification to 10x by rotating the turret, and refocus and focus on the 40x objective.
- Rotate the turret to 40x objective, and locate the desired portion of the specimen in the center of the field. Refocus very carefully so that the specimen is focused as sharply as possible. (Do not alter focus for the following steps )
- Move the objective ½ way to the 100x objective and STOP!
- Place a drop of immersion oil onto the specimen.
- Slide the 100x objective through the immersion oil; this prevents the lens from scratching.
- Focus only with fine focus. Hopefully, the specimen will come into focus quickly. Keep focus the same. If you still have trouble, move the slide slightly left and right, looking for movement in the visual field, and focus on the object which moved.
NOTE: DO NOT USE THE COURSE ADJUSTMENT KNOB!
-
- Never return to the 10x or 40x objectives after applying oil to the specimen since oil can ruin the lower power objectives. (The 4x objective can be used because it is high enough to be above the oil).
- When you are done, remove the slide and clean it. Wipe oil from the slide thoroughly with a Kimwipe. Cleanse stage if any oil has spilled on it. Recap the immersion oil container securely,
- Use lens paper to clean the 100x objective – keep cleaning until the paper no longer becomes transparent or wet looking. Then check the 40x and clean that also- just oil case you got some on it.
Exercise 3 – ELECTRON MICROSCOPE (OPTIONAL)
Using the resources provided by instructor, review the procedures used in preparation and viewing for electron microscopy.
Websites
Detailed procedure for fixing, embedding and staining tissues in electron microscopy
CLEAN-UP
- After the completion of the lab, please turn off the light and unplug the cord.
- Clean all glass parts of the microscope (including the objective lenses, oculars and light source) with lens cleaner and lens paper.
- Clean the mechanical stage, to remove any water or stain on the stage.
- Move the nosepiece until the scanning objective lens is positioned in place.
- Neatly coil the power cord and tie it securely with a twist tie.
Post-Lab Questions (Lab Report)
Copy and paste these questions in a document and answer them.
- Which objective is used to first locate the specimen? Which objective provides the largest field of view?
- Describe the orientation of the letter ‘e’ on the slide compared to how it appears through the oculars.
- Is it possible to tell what order the threads are stacked on the slide (top, middle, bottom)? Why or why not?
- What is the total magnification of the specimen under low power? Under high power?
Licenses and Attributions
Biology I Cellular Processes Laboratory Manual by The authors & Hillsborough Community College is licensed under a Creative Commons Attribution-NonCommercial 4.0 International License.
A prokaryotic cell does not have a true nucleus or membrane-bound organelles. Organisms within the domains Bacteria and Archaea are prokaryotic cell.
Eukaryote cells or organism possesses a clearly defined nucleus. The eukaryotic cell has a nuclear membrane that surrounds the nucleus, in which the well-defined chromosomes are located. Eukaryotic cells also contain organelles, including mitochondria (cellular energy exchangers), Golgi apparatus (secretory device), endoplasmic reticulum (a canal-like system of membranes within the cell), and lysosomes (digestive apparatus).
A compound microscope is used for viewing samples at high magnification (40x - 1000x), which is achieved by the combined effect of two sets of lenses: the ocular lens and the objective lenses. Compound microscope provides a two-dimensional image.
A stereo microscope is a type of optical microscope that allows the user to see a three-dimensional view of a specimen. It is also known as a dissecting microscope or stereo zoom microscope. The stereo microscope have separate objective lenses and eyepieces.
The electron microscope uses a beam of electrons to magnify an object's image. With this microscope, high-resolution images of biological and non-biological specimens are obtained. It is used in biomedical research to investigate the detailed structure of tissues, cells, and organelles. Two main types of electron microscopes are – transmission EM (TEM) and scanning EM (SEM).
